Workshop materials from my January 24th workshop “How to Draw Quick, Useful UI Sketches” organized by Girl Develop It, Los Angeles.

Click here to view and download this presentation on SlideShare.
Workshop materials from my January 24th workshop “How to Draw Quick, Useful UI Sketches” organized by Girl Develop It, Los Angeles.
Click here to view and download this presentation on SlideShare.
I was invited to speak at the Downtown LA UX Study Group on the topic of UX Design Critique. You can look at the slides here, or download the deck from SlideShare.
Here’s the list of resources I reference at the end of the deck.
I enjoy the InVision newsletter because it includes great interviews with designers and useful tips, like this article from Andy Orsow called 7 tips for designing awesome animated GIFs.
I learned how to make animated GIFs with Photoshop at Shillington, but found the process unwieldy. I didn’t realize you could give yourself a huge head start by doing your animations as a video first. I didn’t have ScreenFlow or After Effects, so I was intrigued by Andy’s suggestion that I could use something considerably more low-tech (and probably already on YOUR computer too.)
Pro tip: If ScreenFlow or After Effects aren’t in your budget, create your animation in Keynote, and export it as a video. Yep, there’s finally a use for that setting. —@andyorsow
Here is the result of my little experiment. I made this animated GIF with Keynote and Photoshop. It was a pretty straightforward process and it was a fun way to learn something new. If you want to try it out yourself, please read on for a few more tips you might find helpful.
![]()
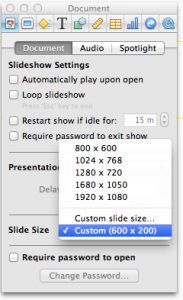
You can change the size of the “canvas” in Keynote by setting the slide size in the inspector. I choose 600×200 because that’s the width of graphics for my blog. You can pick any size that makes sense for your project.
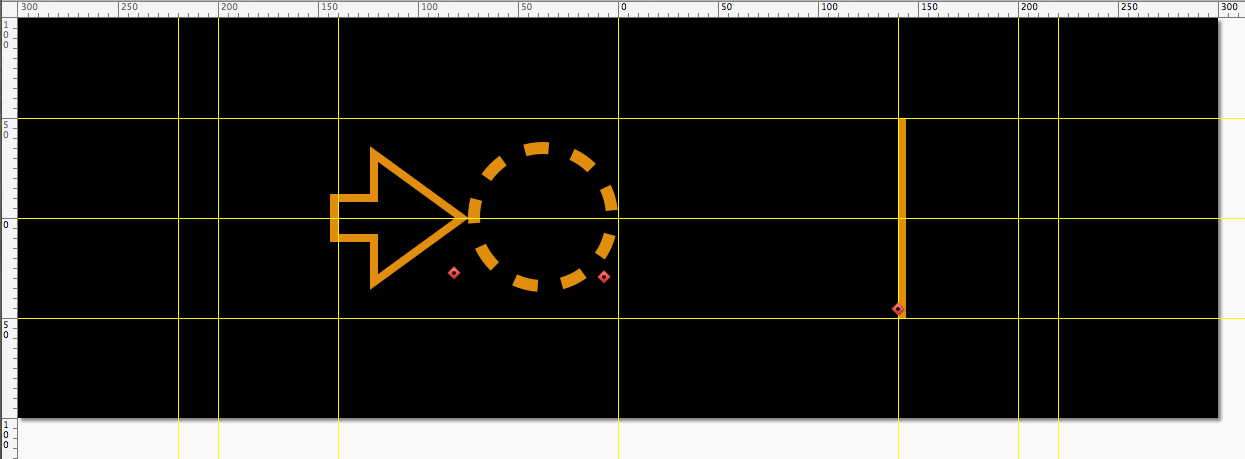
Turn on the rulers and drag some guides so you can orient yourself as you’re working.
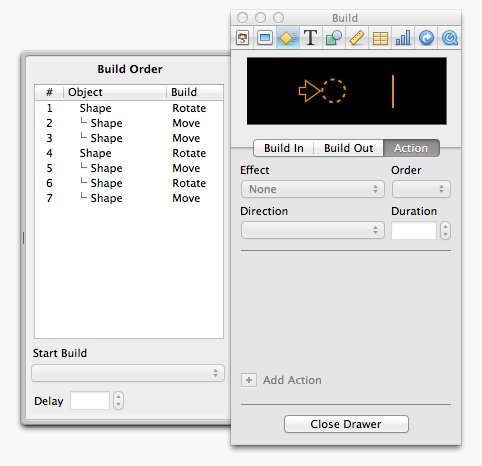
The Keynote animation settings are a little fussy to get used to but there’s a lot already built in. Everything you’ll need us under the “Build” tab of the inspector. You “group” actions by using the “Start Build” drop down, which allows you to run actions at the same time. For example, the circle rotates and moves at the same time, that’s TWO actions)
When you’re ready, export the file to Quicktime format. I only had one slide in my deck with the animation, so I kept all the defaults (Playback Uses: Manual Advance), 24 frames per second. I just turned off Audio (not sure that was actually necessary)
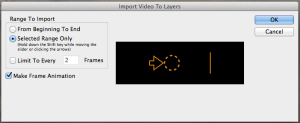
Importing the .mov file into Photoshop was pretty straightforward. File > Import > Video Frames to Layers. As Andy suggested, I chose the option “Limit To Every 2 Frames”
Once I imported the file into Photoshop, I immediately tried to Save for Web, but the GIF didn’t animate. I wasn’t sure what was wrong so the second time I imported it, I opened the animation panel (Window > Animation) and verified the playback was working before I exported.
It was better to do it that way anyhow because I could tune the animation by extending time and removing frames. I found that I needed to extend the last frame to 1 second to make the animation look like there’s a little pause before it starts.
Please leave a comment if you found this helpful or leave a link to your animated GIF project. I’d love to hear from you.
From my half-day workshop at UX London May 30, 2014
Are you challenged by unclear, conflicting and changeable product mandates? Frustrated by other team members who just don’t seem to “get it?” Do you struggle to find a sustainable pace where you can deliver what your team needs to move forward and still have a little time to think ahead?
The increasing popularity of Agile development and Lean Startup have created an expectation of shorter cycles and iterative delivery, yet our teams still ask for for pixel perfect deliverables. At the same time, we are asked to deliver great experiences, advocate for the business value of good design and facilitate a more inclusive ux process with our teams.
This presents us with an interesting set of challenges. How can we develop and support a shared vision while moving forward in small, validated steps? How can we find the right level of fidelity for the artifacts we create? How can we engage with the rest of the team without getting bogged down in “design by committee?”
I believe we can thrive and do good work in this environment of continual change if we reconsider our UX workflow as a framework of tools and activities that can adapt to the needs of our products and teams.
Attendees will learn how to:
Click here to visit the conference site
Click here for an updated version of this class.
As I’ve embraced Agile and Lean Startup methods, I’ve learned to adapt my UX practice so it is more QUICK, VISUAL, COLLABORATIVE and CONTINUOUS. Learning how to quickly sketch screen layouts and user interface (UI) elements helps me think through design problems, communicate ideas to other people, collaborate, and reduce the need for pixel-perfect deliverables.
In this workshop, I’ll lead you through a series of exercises which help you learn to draw good-looking, quick, useful, user interface sketches, followed by a discussion about how and when we can use sketching in our own projects.
No prior sketching or UX experience required, everyone can draw. Just grab some paper, a pencil and an eraser and follow along. This brief tutorial should take you about 1 hour.
I’ve been using LiveScribe products since April ’09 and consider myself a heavy user (filled seven journals, ~100 interviews and conversations recorded). I’m still using the first generation pen, the Pulse 2GB which still works perfectly fine for me. The new one is the Echo, which is available in 4GB (~$150.00 USD) and 8GB (~$200.00 USD)
Overall assessment?
Buy one and try it out. It’s not a lot of money for how useful you’ll find it.
How does it work?

What’s it good for?
Problems?
What do you think?
If you also use LiveScribe products, please leave a comment. I’d be interested in hearing about your experiences so I can learn more about what other people are doing.
I had a great time at Lean Startup Machine last weekend and learned a lot. I’d like to give a big shout-out to my collaborators, Gordon Agress, Joshua Haas, Miraya Yao, Ray Schmitz and Sebastian Park who were all enthusiastic, brilliant and cool under pressure. I sincerely appreciate the time and effort that the organizers and mentors contributed to making the event so great. It was amazing to spend the weekend with so many thought leaders in the Lean Startup space.
Rather than one long blog post about the whole event, I’ll start by writing about something our group found really helpful and several people asked me about, our sketchboard (that big brown piece of paper with all the stuff stuck on it).

The challenge
Lean Startup Machine weekend is intense and not for the faint of heart. In just 48 hours, you form a team, decide on an idea to pursue, and create a product using Lean Startup principles and activities. We needed to engage in customer discovery activities in an asynchronous, and yet coordinated way. How would we keep track of what we were doing and understand patterns as they emerged, without a lot of time for synthesis or reflection? Based on some good experiences I’ve had using sketchboards as part of the LUXr program, I decided to build a sketchboard to help us track our evolving understanding of the problem, the users and their needs.
What was on our sketchboard?
Our sketchboard evolved over the weekend. We added new information and put revised information on top of older versions, but the structure I established at the beginning held up pretty well. I tried to set it up so it supported telling a story about the problem we were solving. The project name and objectives at the top, problem, ecology and competitive information on the left, user research, segmentation and personas on the right.
Note: you can click on the image to see a larger version of the sketchboard

A – Our project name “DomainMatcher”
B – Our hypothesis, Customer-Problem-Solution statement
C – Competitors in the space
D – Sketch of the ecosystem, with subject matter experts (SMEs) outside buyers and sellers
E/F – This section started out as just two groups domain “sellers” (E) and domain “buyers” (F) but quickly evolved to visually represent our segmentation theory. Sellers were arranged by low # domains to high # domains held and buyers were arranged into buckets (founders, advertisers, blogger/vanity and flippers). The blue tape indicates we engaged with that person. The provisional personas (Sam the seller and Brenda the buyer) were added once we determined our early adopter targets and drew on elements we heard in our conversations with buyers and sellers.
G – Paper prototype of our buyer Minimum Viable Product v.1
H – A reminder of our goals for the weekend, “Question assumptions” “Iterate” and “Get out of the building.”
How it helped us
I expected that this would help our team keep track of the work to be done and help us create a shared understanding of emerging patterns. I was pleasantly surprised at how quickly people jumped in, contributed their own elements to the board and used it as a focal point for conversation. I believe a healthy sketchboard is owned by the entire team, and isn’t the work of a single person.

An unexpected side-benefit was how it made it easier for us to engage with other people. Several mentors and LSM participants came by, looked at the board and said “OK, I get it, here’s something I can do to help.” It was great to have a visual artifact we could use to quickly orient other people to our project and where we stood, pretty much in real time.
More about sketchboards
If you want to see another example of a sketchboard used in a slightly different way (with a nifty video), check out this post from the Adaptive Path blog “Sketchboards: Discover Better + Faster UX Solutions.”
More about Lean Startup Machine
Lean Startup Machine is a weekend long boot-camp where entrepreneurs learn Lean Startup principles through real-world problem solving and coaching from mentors that get it. In 48 hrs, you’ll pitch an idea, form a team and attempt to build something customers actually want. The prize? Cash, mentorship and glory. This is a single weekend that will change how you think about building startups forever.